This week we would have been starting to manufacture the sumo bot. Due to the covid-19 outbreak we have decided to not go ahead with the manufacturing due to the lack of resources and lack or material. We will talk through the processes we would have been using and the materials we would have been using.
The base of the sumo bot.
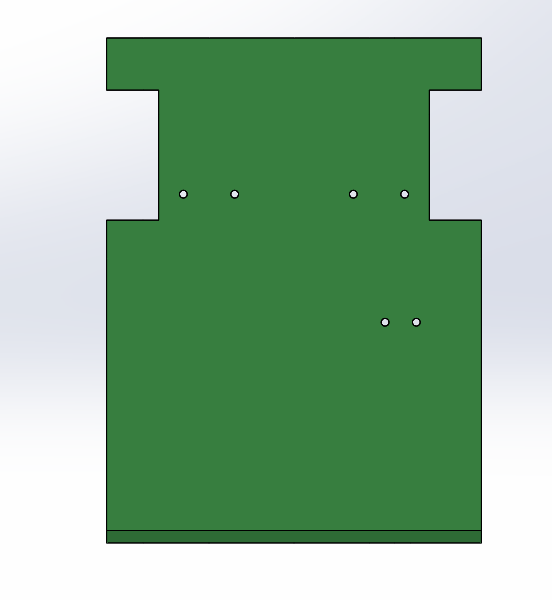
This base would have been made out of 3mm acrylic as can be seen in our working drawings. We used 3mm acrylic for to ensure the robot has enough strength but also to keep weight down as the weight limit is 1kg. We had to decide on the most effective and accurate process for manufacturing this piece, so we decided to go with laser cutting. Due to the complex shape of the part, it would have been tricky to file down by hand and the positioning and small size of the holes meant it would have been difficult for to drill these with a pillar drill. Some of the holes were also close to the edges of the piece so drilling might have led to us cracking the piece. Due to these, laser cutting was clearly the most efficient process for us to use.
We sent the part file to the laser cutting software and that sent it to the cutter.
The process of laser cutting is described in depth in the previous manufacturing post. It is essentially a laser which is concentrated to a tiny area of the acrylic and cuts through the material with great accuracy and leaves a smooth finish. The pros for us when looking at laser cutting as a process option were:
1) Faster than filing and drilling
2) More accurate than filing and drilling
3) smoother surface finish than rough filing
We could not see any major draw backs when considering laser cutting so we decided to use it for the main shell and the base of the robot.

Flipper arm

Again, the flipper arm is going to be made from 3mm acrylic. We could have used sheet aluminium to reduce weight, but we knew that the arm must be strong and not flex when flipping opponents to be most effective. We carried out a test on 3 materials, 5mm Perspex, 3mm acylic and 2mm aluminium. We found the mass of each different material and then placed a 2kg weight on the object when it was suspended between two blocks. We observed the strength of each object and noticed that the aluminium began flexing. We noticed the 3mm acrylic held up to the 2kg weight (twice the weight that will be applied to it) and so did the 5mm Perspex. The Perspex was considerably heavier and so we decided to go with the acrylic to maximise strength and minimise weight.


To manufacture this piece, we looked again at laser cutting. But after seeing how long setting up the file and the machine to laser cut the body and base, we decided against laser cutting for the arm. We decided against it due to the part being a relatively simple shape with only 4 holes to be drilled in it. Although the holes were close to the edge, we decided to try file and drill the piece with a pillar drill first and set the drill to a slow speed to ensure it does not crack. The holes are small so we should be able to drill them using a pillar drill. We firstly marked out the piece on the acrylic ensure there is minimum waste. We cut out the shape of the piece with the band saw, leaving 2mm past each line for to file it down and ensure we can get a good finish on the acrylic. We used a rough file to get the material down to roughly 1mm from the line, and then used a smaller smoother file to get down further. We then used the draw filing technique and then used emery cloth for draw filing. This ensured a smooth finish. We then drilled the holes using the pillar drill on the slowest setting. This allowed us to drill the holes without cracking the piece. The holes were 3mm so we did not have to use a pilot hole. Once that was done, we then went back and put oil on the emery paper and got the final finish on the outer edges of the piece.


